Self Hosting Services on Android Phone
May 08, 2023 · 10 min read
建议 Tips
您正在查看印刷版本的博客, 印刷版本的博客可能会缺少部分交互功能, 部分内容显示不全或过时. 如果您在查看该印刷版博客时遇到了任何问题, 欢迎来此链接查看在线版: https://www.kxxt.dev/blog/self-hosting-services-on-android-phone/
You are viewing a printed version of this blog. It may lack some interactive features and some content might now be fully displayed or outdated. If you encounter any problems while viewing this printed version of the blog, feel free to view the online version here: https://www.kxxt.dev/blog/self-hosting-services-on-android-phone/
Sometimes I want to self-host some services. But my VPS is already overloaded and I don’t want to rent a new VPS. Maybe it is a good idea to host services on my Android phone. The phone is always connected to the Internet and it is powerful enough to run some services. To be honest, it is too powerful that I usually don’t use it to its full potential. So why not use it to host some services? And I always keep my phone from running out of battery.
I am running LineageOS on my phone. It is a custom Android ROM that is free and open-source. This article is based on LineageOS. If you are using other Android ROMs, you need to know how to build a custom kernel for your phone.
Some assumptions before continuing:
- You have unlocked the bootloader of your phone.
- You have a rooted Android phone running LineageOS.
- If you are not using LineageOS, this article may still be helpful to you, but you can’t follow the steps exactly.
- You have installed Termux on your phone and you know it well.
- You have basic knowledge of Docker.
- You understand that following the instructions in this article may cause your phone to be bricked.
- I am not responsible for any damage to your phone.
- You are using a Linux machine.
- You should be comfortable with using the command line on linux, if not, you should learn it first.
- Your phone is is using the latest version of LineageOS.
- If not, you should update it first.
Warning
Be sure to check all the assumptions above before continuing.
Making changes to boot.img is DANGEROUS. And I am not responsible for any damage to your phone.
You should know what you are doing before continuing.
I found that there is already a guide on how to run Docker in termux. (It will be called the guide in the following text) But it is a generic guide and I want something more specific to my phone, or LineageOS. So I wrote this article.
Building Kernel from Source
The default kernel of LineageOS doesn’t support some features that are required by Docker. So we need to build a custom kernel for our phone.
First, clone the LineageOS source code and set up the build environment by following the official guide. (Select your phone model and follow the instructions under “Build for yourself”). You should stop before the “Start the build” section.
After that, you should have a directory android/lineage under your home/working directory.
Note
By default,
all the relative paths in this article are relative to android/lineage.
Then, let’s try to build the kernel and boot.img to see if everything is working.
cd android/lineagesource build/envsetup.shbreakfast <your phone model>m bootimage
If everything works fine, you should see the boot.img under out/target/product/<your phone model>/boot.img.
Before customizing the kernel, we should verify that the untampered kernel can boot successfully. Then magisk patch it and flash it to your phone in fastboot.
adb reboot fastbootfastboot flash boot magisk_patched.img
If it boots successfully, you can continue to customize the kernel 🎉 🎉 🎉.
Otherwise, you should fix the problem first. Unfortunately, I can’t help you with that because most errors are device-specific.
Build a Custom Kernel
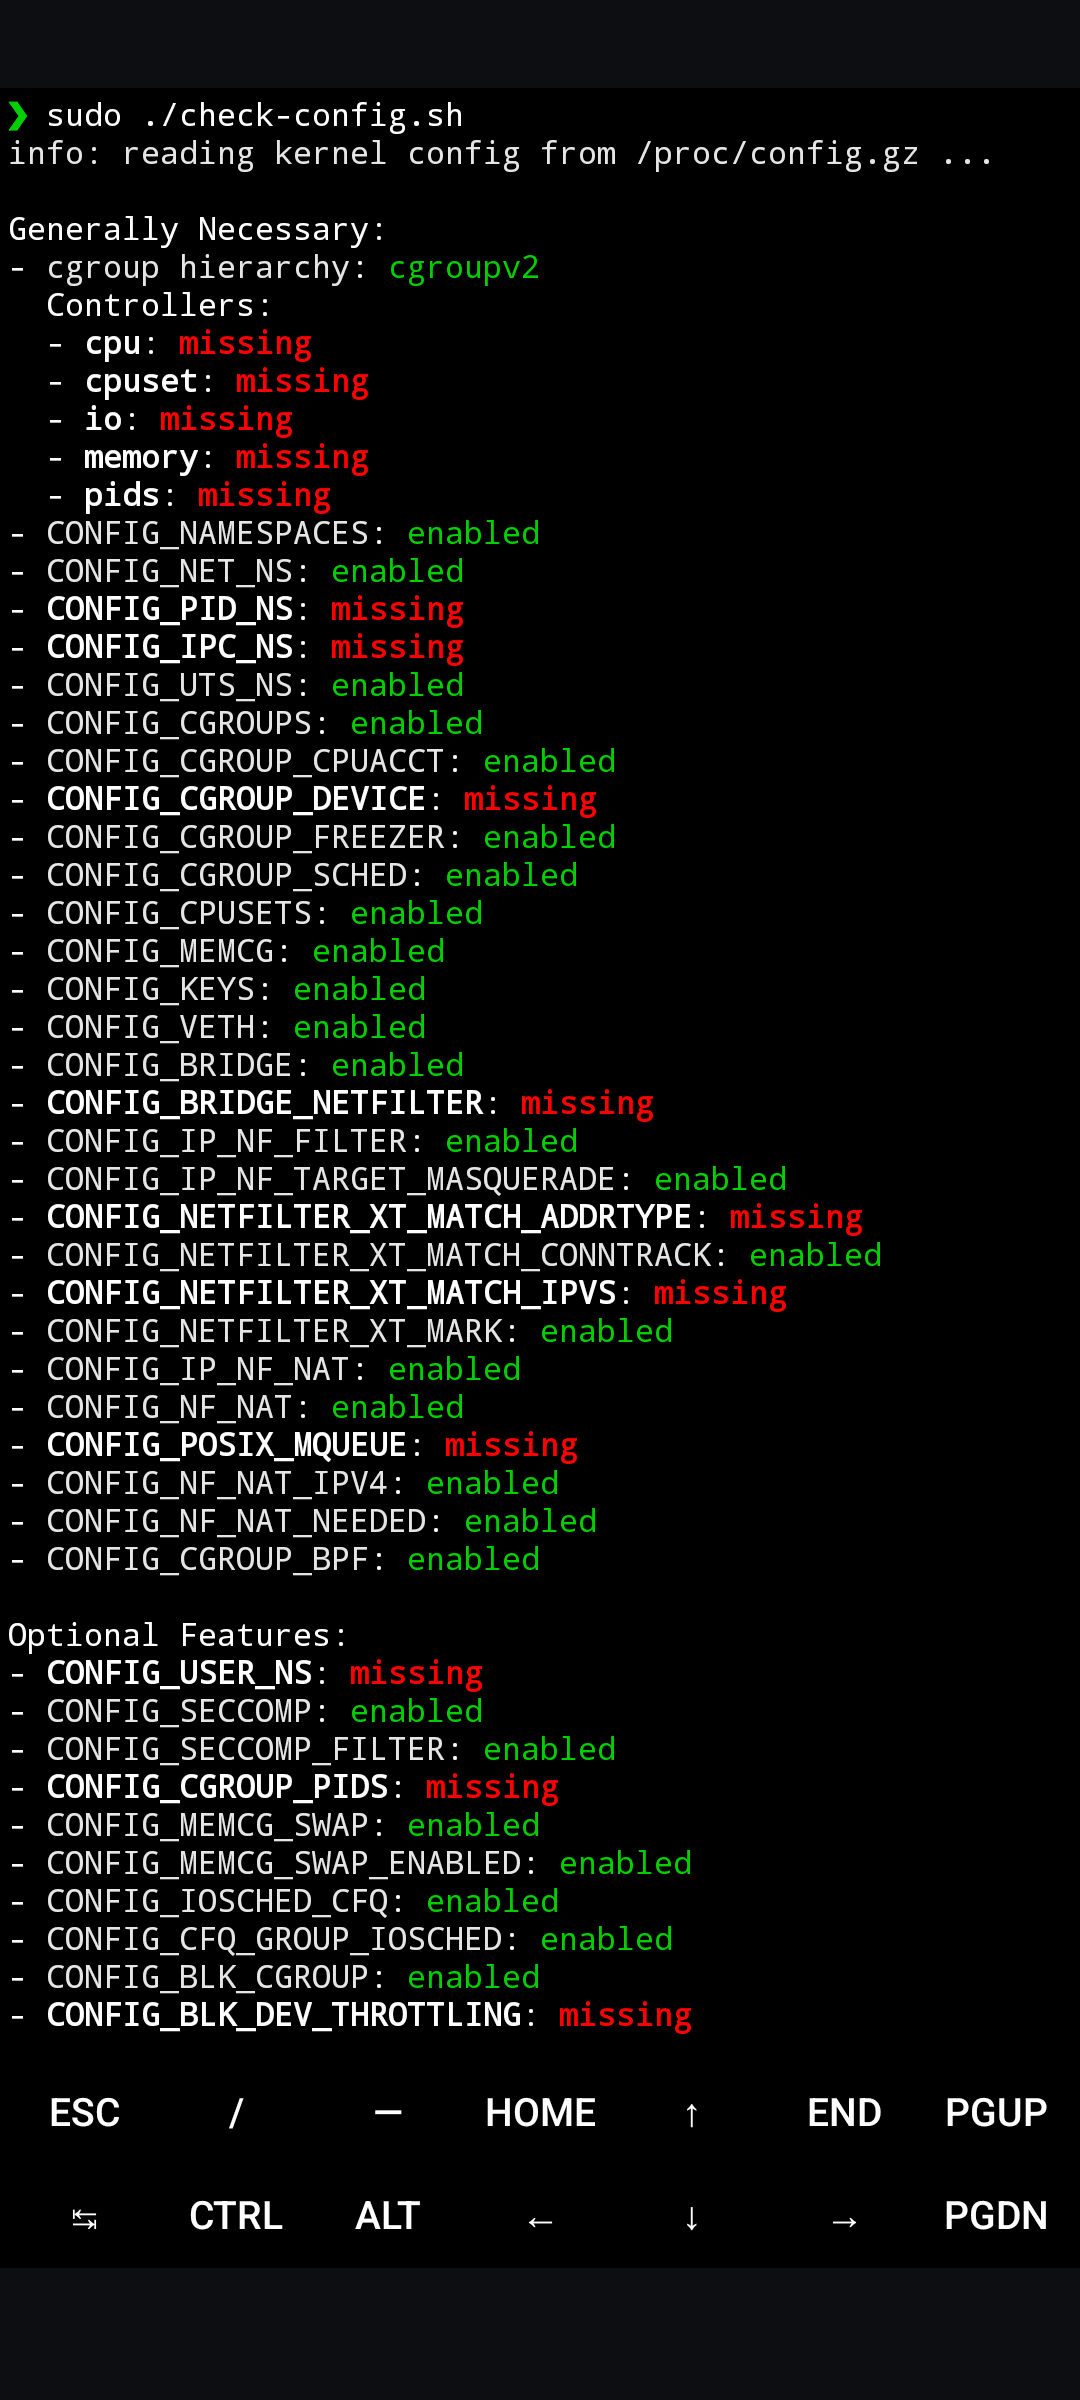
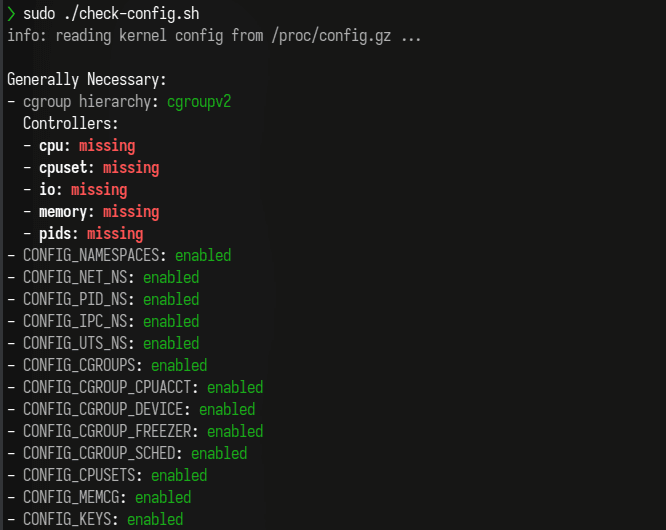
First, let’s check what config options are missing in the default kernel.
In termux, run the following commands one by one:
pkg install wgetwget https://raw.githubusercontent.com/moby/moby/master/contrib/check-config.shchmod +x check-config.shsed -i '1s_.*_#!/data/data/com.termux/files/usr/bin/bash_' check-config.shsudo ./check-config.sh
You should see a lot of config options are missing. We need to enable some of them in the kernel config.
Then, let’s get our hands dirty! First of all, find the kernel source directory of your phone model.
Find the Kernel Source Directory
For me, it is kernel/xiaomi/sm8250. If you can’t find it at a glance, you can usually find it by looking
at the BoardConfig.mk file under device/<your phone manufacturer>/<your phone model>/. In my case,
this file includes another file:
include device/xiaomi/sm8250-common/BoardConfigCommon.mk
By taking a look at device/xiaomi/sm8250-common/BoardConfigCommon.mk,
I found that my kernel source directory is kernel/xiaomi/sm8250:
$ grep kernel BoardConfigCommon.mkTARGET_KERNEL_SOURCE := kernel/xiaomi/sm8250
Patching
Note
This section assumes that you are in the kernel source directory. By default, all the relative paths in this section are relative to the kernel source directory.
Following the guide, there is a file that needs to be patched1 because of a bug introduced by Google.
curl -L https://gist.github.com/kxxt/9e6d0edc57e2dbc62ac8ba09383230ef/raw/6c35eb39b5f6baa4f3ad67e55298400365511470/termux-kernel-docker.patch \ | patch -Np1
Configuring
Then, we need to enable some config options.
Make a copy of the config file of your phone and edit it:
cd arch/arm64/configs/cp vendor/<your phone vendor>/<your phone model>.config docker.configvim docker.config
Based on the check results I get inside termux, I appended the following lines. You may need to append more lines depending on your check results.
# Docker supportCONFIG_SYSVIPC=yCONFIG_CGROUPS=yCONFIG_MEMCG=yCONFIG_BLK_CGROUP=yCONFIG_CGROUP_SCHED=yCONFIG_CFS_BANDWIDTH=yCONFIG_CGROUP_PIDS=yCONFIG_CGROUP_DEVICE=yCONFIG_USER_NS=yCONFIG_PID_NS=yCONFIG_SMP=yCONFIG_BRIDGE_NETFILTER=yCONFIG_CGROUP_PER=yCONFIG_NETFILTER_XT_MATCH_ADDRTYPE=yCONFIG_IP_VS=yCONFIG_IP_VS_NFCT=yCONFIG_IP_VS_PROTO_TCP=yCONFIG_IP_VS_PROTO_UDP=yCONFIG_IP_VS_RR=yCONFIG_NETFILTER_XT_MATCH_IPVS=yCONFIG_POSIX_MQUEUE=yCONFIG_VXLAN=yCONFIG_BRIDGE_VLAN_FILTERING=yCONFIG_IPVLAN=yCONFIG_MACVLAN=yCONFIG_DM_THIN_PROVISIONING=y# OptionalCONFIG_BLK_DEV_THROTTLING=yCONFIG_NET_CLS_CGROUP=yCONFIG_CGROUP_NET_PRIO=y
And commit all the changes then clean the kernel directory:
git add arch netgit commit -m "docker support"make mrproper
Tip
In my case, make mrproper deleted some nesscessary files with file extension .i.
If you encounter the same problem, you can restore them by running the following command:
git restore '*.i'
Then modify the BoardConfig.mk file of your phone:
It should be under device/<your phone manufacturer>/<your phone model>/BoardConfig.mk (relative to repo root).
Change the TARGET_KERNEL_CONFIG variable to make it point to the config file we just created:
TARGET_KERNEL_CONFIG += docker.config
Building
Finally, we can build the kernel:
Execute the following command at the root directory of the repo to build the kernel:
source build/envsetup.shbreakfast <your phone model>m bootimage
Flashing
If everything works fine, you should find the result boot.img under out/target/product/<your phone model>/.
Magisk patch it as before and flash it to your phone.
adb reboot fastbootfastboot flash boot magisk_patched_with_docker_enabled_boot.img
Check again
If everything goes well, and you phone still boots, let us check again if docker works.
In termux:
sudo ./check-config.sh
For me, some cgroup controllers are still missing. But I can still run docker containers. Maybe it is the check script’s bug.
Install docker
Installing docker on termux is very convenient now. Just run the following command:
pkg install root-repo && pkg install docker
Run it!
Now it is time to run docker!
Let’s start the docker daemon first:
sudo dockerd --iptables=false
Then, open another termux session by swiping from the left edge of the screen to the right and click “New session”.
Let’s start with a simple hello world:
sudo docker run hello-world
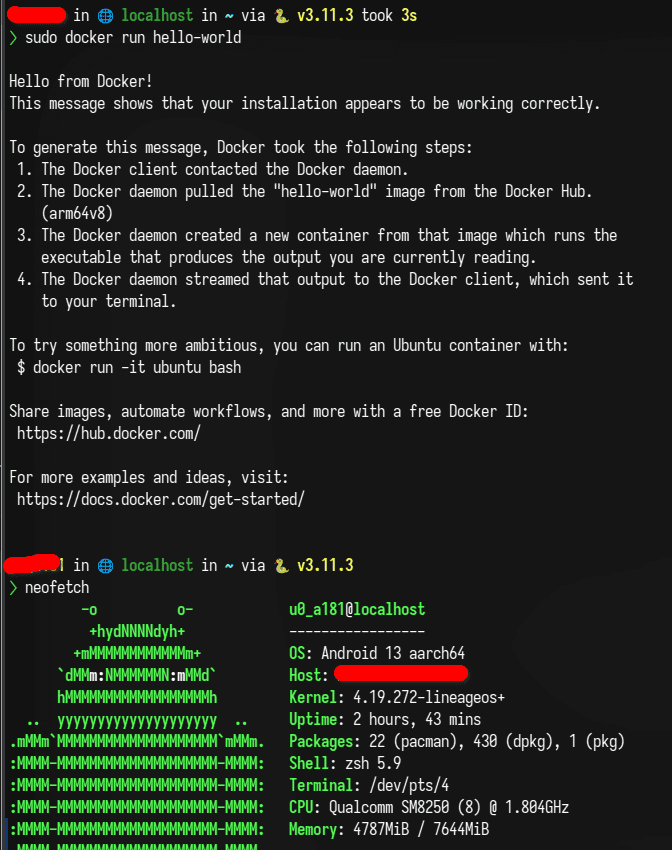
It works! 🎉 😄 😄 😄
Then let’s try something more complicated:
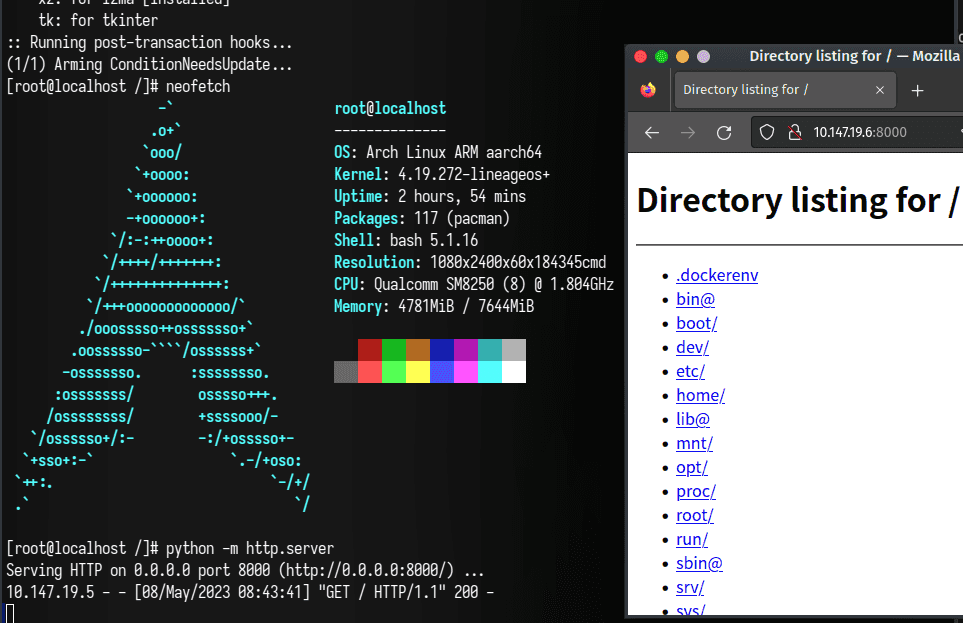
sudo docker run -it --net=host --dns=8.8.8.8 menci/archlinuxarm bash# inside the containersudo pacman -Sypacman -S neofetch pythonneofetchpython -m http.server
It works! 🎉 🎉 🎉 I can access the web server from my laptop! (I am using zerotier one to connect my phone and laptop via a virtual network)
To prove the potentional of docker on android, I tried to run vaultwarden (a self-hosted bitwarden server) on my phone.
It works! 🎉 🎉 🎉 🎉 🎉 Although I prefer to run it on my VPS.

Caveats
See the guide for more details.
With bridged networking, you can’t access the internet from inside the container.
You can use --net=host --dns=8.8.8.8 to solve this problem.
But with this solution, non root users inside the container can’t bind.
I haven’t figured out how to solve this problem yet.
To workaroud this problem, we can rewrite the Dockerfile to use the root user.
Using shared volume is also problematic. I plan to just store the data in the container.
References
- https://gist.github.com/FreddieOliveira/efe850df7ff3951cb62d74bd770dce27
- https://www.reddit.com/r/LineageOS/comments/119qdd9/need_help_building_kernel_in_tree_with_custom/